The best way to learn a new Javascript framework is to build something. So, I decided to build a Lead Dashboard using Vue.js, the WordPress REST API, and some other plugins and frameworks.
See the Dashboard in action:
Some of the topics in this post can get a bit technical. If you are not familiar with the WordPress REST API or Vue.js, this might be hard to get up and going on your end. With that said, all the code is up on GitHub so feel free to make any changes to fit your needs.
Why was this Lead Dashboard Built?
- I wanted to check out Vue.js
- I needed a better solution to track and manage leads for clients
To expand on the second point, I do digital marketing for a handful of clients. This entails driving traffic to client websites to increase their customers and sales.
A popular way to capture leads online is for a potential customer to fill out a web form on a website. Once the form is submitted the contact details are sent out so they can be contacted. Unless the business has some type of CRM that captures these leads, they normally just get sent out to an email address. The staff will then reach out to the leads as they receive new emails.
Here is the workflow I normally see:
- Potential customer goes to the business website
- The potential customer fills out a form on the website to get a free quote or consultation
- Once submitted, the form information is sent to business owner/staff via email
- Business owner/staff contact leads
- Business owner/staff figure out a solution to track leads and determine who they have contacted, which leads need follow-ups, which leads are good/bad, etc.
The Problem
This works, but can quickly get out of hand. Especially if your digital marketing campaign is driving a ton of leads. =)
If the leads are getting sent out via email, they can get lost in the day-to-day email conversations. The leads started getting missed and unanswered which is just wasting the marketing budget.
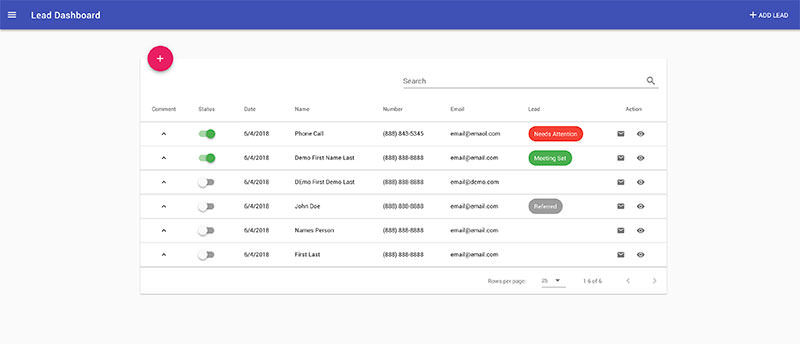
This can be managed in all kinds of different ways, but what I did was create a Lead Dashboard for my clients.
The Solution
Now the workflow looks like the following:
- Potential customer goes to the business website
- The potential customer fills out a form on the website to get a free quote or consultation
- Once submitted, the form information is sent to business owner/staff via email and to the Lead Dashboard
- Business owner/staff contact leads
- Business owner/staff use Lead Dashboard to track leads, add notes to each lead, edit leads, edit lead status, etc.
Instead of trying to figure out a solution to manage the leads, the business now has a Dashboard dedicated to their business leads.
How does this Lead Dashboard Work?
It uses a few WordPress plugins, the WordPress REST API, and Vue.js.
First, the Contact 7 WordPress plugin is used to create and add forms to the website. I then use the Flamingo plugin to capture and store any Contact 7 form submission. From here, I created a simple plugin that adds custom REST endpoints to access the stored Flamingo submissions. Finally, I use Vue.js and Vuetify to call the WP REST endpoints and display the submissions in a Material Design Lead Dashboard.
I would also like to mention here that I use the JWT Authentication plugin so only people with login details can see the leads.
That’s it…
How to Setup the Lead Dashboard
The following is for a local development environment.
You need WordPress installed with the Contact 7, Flamingo, JWT Authentication, and FlamingoREST plugins installed and activated.
Follow the setup for the JWT Authentication that is listed on the plugin page. You don’t need to install the WP API plugin; the REST API has been merged into WordPress core.
For this, you will just need to add a couple of lines to your wp-config.php and .htaccess file.
Make sure the lines of code you add in the .htaccess file are directly under
RewriteEngine onNext, you will want to create a directory where the Lead Dashboard will live.
For example, I normally create a directory called /leads/ in the root of my WordPress install. So the Lead Dashboard can be accessed at https://localhost:8888/leads
Grab the Lead Dashboard files at https://github.com/braginteractive/VueWPLeads and put them in this directory.
Use your terminal to cd into this directory and run npm install.
FYI, this project started with the Vue Webpack template.
Once your dependencies are installed, go into /leads/config/index.js and change line 16 to your dev URL.
Now just run npm run dev in your terminal. You should be given a URL in the terminal to access the Lead Dashboard.
If you set up the JWT Authentication plugin correctly, you should be able to login with your WordPress login details.
Sweet!
All you need to do now is set up a page on your WordPress site with a Contact 7 form.
Use the following Contact 7 form markup:
[submit "Send"]
Start submitting dummy data into the form and check the Lead Dashboard. It should be populated with data!
Customization
Feel free to make any customization you would like! You need some HTML, PHP, and Vue.js knowledge. This was my first Vue.js project so I am sure there are some best practice and optimizations that can be made to the code base.
Submit some PRs!
Going to Production
Once you have made all your customizations and you are ready to your code on your production site, simply run npm run build. This will create a /dist/ directory with all files minified. Upload the files in the /dist/ directory to your /leads/ directory on your production server. You will also need all the plugins and settings from your local development enviroment.
Have Fun!
The clients I have introduced this Lead Dashboard to love it! The Dashboard saves them time and easily integrates into their current workflow.
Hope this helps you and your clients.